Hello All!! A couple posts back I showed you all my smoking nook in the Addams mansion! I had made some
special shutters to go in there and a few people asked me for a tutorial. This is my Halloween gift to you... a rare Ara tutorial (most of my stuff is trial and error so tutorials are sometimes hard for me!).
What you will need: A box cutter or Xacto Knife, 1/4"x1/8" basswood (optional for the end), pliers, a pencil for marking measurements, a ruler, a paintbrush, paint in the color of your liking, cardstock (or cutting up an old birthday card would work), matboard, and a cutting mat to work on! And GLUE! I forgot it in the pic of materials!
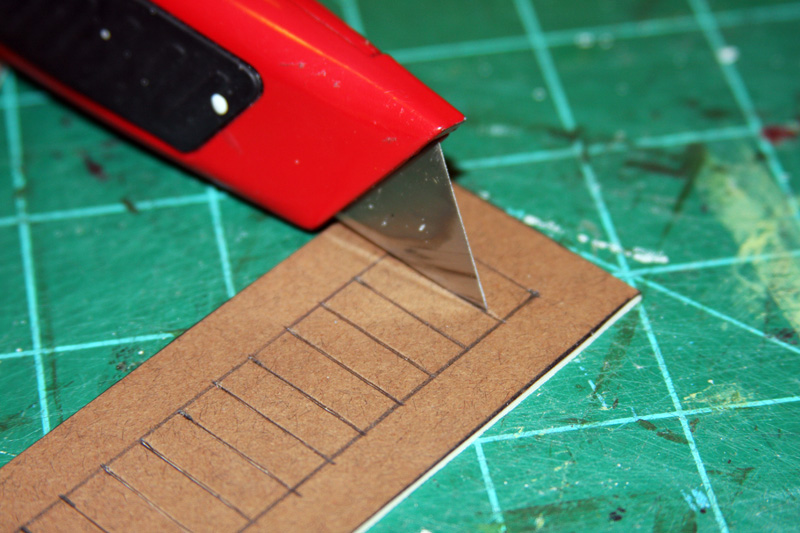
Here is the basic measurements that I used for my shutters. They worked great on my Real Good Toys, Alison Jr. windows. If you are working on another brand or custom house you may have to make adjustments to these measurements. Notice that you will only be cutting on the lines marked in red!
Go ahead and mark out the 1.5"x6" for each shutter. You can do several at one time if you have multiple windows! I will be doing four at a time here...
You can draw all the measurements on the shutters before cutting them apart. You will have to measure less this way because you can just carry the pencil lines across all four shutters.
Then carefully cut them apart!
Begin slicing along the horizontal lines (remember not to do the vertical or all of your louvers will just fall out!)
Cut in both directions for each cut. This ensure you are cutting all the way through the entire length of the louver.
If you don't you can get these uneven lines seen below... see how the ones that have been cut in both directions on the top are going all the way through the entire length... the lower cuts have only been cut one way.
After all your horizontal cuts are made take your knife and stab at the edges of each cut. This will make sure the paper rips where you want it to when you start twisting the louvers out.
Can you see the little stabs on the right side of the horizontal cuts? Do this for both sides of each cut.
This is where I need to enter a disclaimer! You are about to get frustrated!! Especially if you are a perfectionist! The process of twisting the louvers can get messy and annoying! But I will show you how to fix the rips and tears to work to your advantage!
Take your pliers and put it in the second cut from the top. Grab hold of the louver with the pliers and twist it until the bottom of the louver pops out.
You may have to work your pliers back and forth under the louver to get it to pop out correctly.
If you are getting frustrated with the first few... keep going. It starts to get easier as you get a feel for working with the pliers and twisting.
Occasionally you will have pieces of the matboard rip off. No problem! Just glue them back on or rip the piece off. Remember we are making spooky shutters so they are ok if they are imperfect!
Also occasionally a louver will totally let go of the side pieces.... no problem...
Take a little glue and glue the louver piece as if it was supposed to break and it will add to the spookyness!
Below you can see all of my shutters finished. I even broke a few more louvers to get the desired effect I wanted! Have fun with it!
From here you can rest your hands a bit! Ouch this process can be a bit painful with all the cutting and twisting!
Cut out six small bits of card stock. These are approx 1/2"x3/8". These are your hinges.
Make sure you know how you want your shutters to lay, and make sure the louvers are all facing the same way before you glue! Glue 3 pieces on each pair of shutters as seen below.
Below you can see how beat up my shutters were after twisting! So don't get discouraged if yours are ripping too!
Next is the fun part! Take out your base acrylic color and paint all over the front and back of the shutter. The acrylic will seal the paper and you won't have to worry about the matboard shutters splitting anymore.
Next you can take some aging colors. I have a dark green and dark brown here that I just lightly brush over the white base coat to age them. And this also makes the lines of the louvers stand out so no one misses how intricate they look!
And here is your final product!!!
From here they are ready to glue anywhere you want them. You can make single ones to glue on the outside of houses too. If you are not wanting to permenantly glue the shutters on, you can do what I did in the smoking nook...
I measured the height of the window the shutter was going on and then I got two pieces of basswood and placed them that distance apart. I then glued the shutters down on top of the basswood pieces. You can paint the basswood pieces the same color as the wall if you want them to be less seen. Now the top and the bottom pieces of basswood just slip around the edges of the dollhouse window and it stays put. Easy peasy!
I hope this was helpful!!! It took me about 3 hours to do these 4 shutters with chasing a toddler around in between. Just be ready to get a hand massage afterwards!
Please stay tuned as tomorrow I will be posting a give away!! One of the prizes will be the shutters I just made in the tutorial!!! So if you have a spooky mini project going on this will be the give-away to enter.
Hugs, Ara


Awesome tutorial Ara! Down the road I will defiantly be using this tutorial. I remember chasing a toddler LOL.
ReplyDeleteHugs,
Victoria
Thanks Victoria! Toddlers def make everything more...uh... interesting! lol! -ara
DeleteGreat tutorial Ara! It's amazing what you can make with matboard!! I love how you've aged them with the paint too :)
ReplyDeleteThanks Kim! The painting is my favorite part! I am not sure I can paint anything that isn't aged anymore! -Ara
Deletewow, this is a great tutorial and very easy to do (I love easy)
ReplyDeletethank you so much :)
PS keep your keys high up on the kitchen counter, you'll be glad you did (for some reason tots like to play with them and lose them we had to call a locksmith twice for our car keys)
Love
Marisa
Thanks Marisa! We haven't had to call a locksmith yet... but she does have a strange obsession with my keys!!! lol
DeleteExactly what I need! THANK YOU Ara for this wonderful tut! You are my angel :):).
ReplyDeleteYay! I am glad it will help you out!! I can't wait to see how you put it to use! hugs, ara
DeleteHarikasınız. Sizi takibe aldım. Sevgilerimle Funda
ReplyDeleteThank you Funda! Its so fun to see comments from new followers all over the world! -Ara
DeleteThis looks awesome ! (:
ReplyDeleteCan you make one for a retractable roof?? I've been trying to make one with a retractable triangulated roof and glass side panels that slide as you move the roof back and forth. But so far it hasn't worked out.
Wow that sounds complicated! I am not sure if I could make that or not lol. Do you have a blog? I would love to see what you are working on! thanks for the comment! -Ara
DeleteThis comment has been removed by a blog administrator.
ReplyDeleteThis comment has been removed by a blog administrator.
ReplyDelete