I had a friend here in blog land comment on the photographs of my minis and how I did it so here is my post for her and anyone else frustrated with photographing their minis!
I don't thing I have told y'all much about it, but I have my own photography business on the side (besides my day job) So I thought I would share a few tips on how I get some of my photos to come out ok. I am a portrait photographer so photographing minis has been a new challenge for me and so I've played around with it a lot. So anyway here is a tutorial on how to do this:
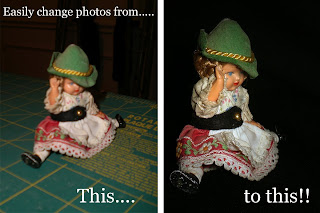
If you click on the photo you can see a bit better that the first picture is blurry and the second is tack-sharp! And several other differences. And the following well help you get there.
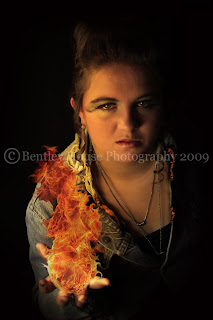
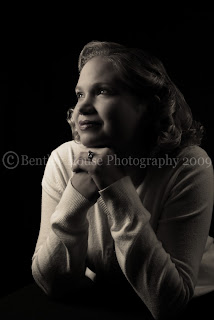
Also, thought I would share a bit of my work with you since I haven't done that before. Here's a couple portraits.... can you tell I love the dramatic? Of course this is done with big stand lights and big backdrops, and lots of photoshop but we'll do something a bit more simple for our minis.
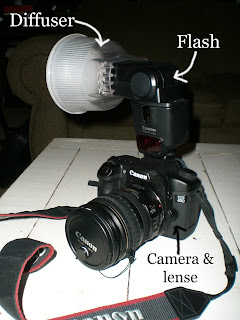
Here is my camera set up below.... Now don't freak out. I know not everyone is going to have this so I have tailored my tutorial around a camera type that most everyone will have. I digital camera with a retractable lens and built in flash. Below I just wanted to show you the parts so you can see how we are adapting them in the tutorial below.
The bottom item is of course, the camera body and lens. The part above that (in the 'L' shape) is the flash that I have turned to the side. And then at the very top, the weird bowl-looking thing is called a diffuser. It takes the light from the flash and scatters it all around instead of shooting it strait at what you are photographing. This makes a softer and more pleasing light.
Now to start the 4 easy steps..... We'll start with the 4 main things that went WRONG with the left photo at the very top.
1. The camera was handheld and not secured to a tri-pod. This makes it easier for the photos to come out blurry - esp in dark conditions.
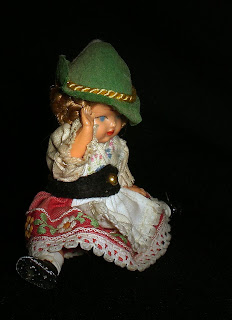
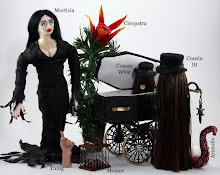
2. The background is muddled with all sorts of stuff that steals a persons eye away from the mini (Greta the doll, our model for today)
3. Greta is being flashed head-on by a flash creating a harsh shadow and glares off her face.
4. The camera was held too close to Greta for it to properly focus.
Side note: I am not suggesting this be done for every single photo you take. Sometimes you just want to snap and go... I do that too (even for this photo tutorial). I am just wanting to give help to those who are struggling getting really crisp photos of their final work.
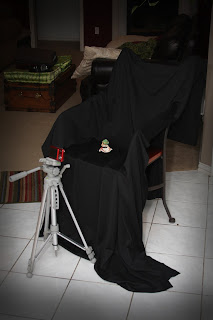
Fix #1: Get a tripod and put your camera on it! It will help, trust me! You can get a very cheap tripod these days and its worth it when photographing your hard work. All cameras ( I am pretty sure) have a hole in the base that looks like a screw would go into it... that's where the camera connects to the tripod.
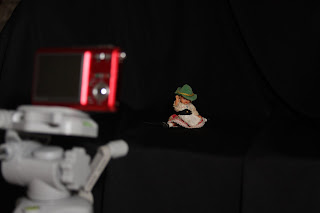
Fix #2: Make a mini-studio with a chair and a black or white cloth. I always grab one of our kitchen chairs that has arms. This way I can drape it with fabric all around and it makes a little cave-thing for my minis to be photographed in. You can even use bedsheets for this method (but maybe not ones that are too busy looking).
See Greta is all ready for her close up!
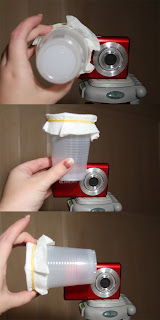
Fix #3: Home made diffuser: All you need is a clear plastic cup, a square of paper towel and a rubber band. This will function the same as the diffuser you saw on my set up above. You simply hold the entire contraption in front of your flash. The only tricky thing about this is that it doesn't acutally snap onto your camera most of the time. Also, you will have to be careful that it doesn't show up in your picture while you are using it.

I suggest to make one of these, and set aside a day to practice with it. moving it different ways can sometimes have different results. It can get frustrating at times but just walk away and come back when you feel like it. Also if you are tired of holding the cup-diffuser, some cameras do make snap on diffusers so you can look and see online. (But you can see how the tripod would also help here...) (sorry about the chipped nail polish - eek!)
Fix #4: Don't force your camera to shoot too close to the object. Many lenses on cameras have a definite limit on how close they can focus. If your camera is not focusing correctly back up and try again. Most newer cameras have a high enough resolution so that you can take a large picture and crop only what you want to see and still have a decent shot. Below you can see how far back I was from Greta before my camera focused properly.
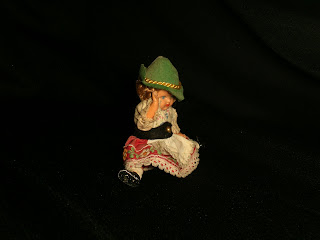
And now this last photo is the final photo cropped from the one above. Yes, this was taken by my little red camera with the home-made diffuser in use so you can see what any camera can do. Hopefully you can click on it and make it bigger to see the detail. You can see the detail in her hair and the stitches in her clothing. Now don't you want people to see that after all the hard work you put in?
Also I did a bit of color correction that is very easy to do in photoshop. However I know a lot of people aren't too excited to spend that much on photoshop. If you look for Photoshop Elements it is a bit cheaper than the full blow version. Also you can look up the program called 'Picasa'. It is FREE!! to download and super easy to use. It also funtions as an organizational tool for all your photos. I am still learning its ins and outs but I think its a great program.
Well I hope this helped a bit for anyone getting frustrated with photos. If anyone has any question please leave a comment and I will try to answer!!

 Here is the main part of the back. You can see where it originally came from here.


